
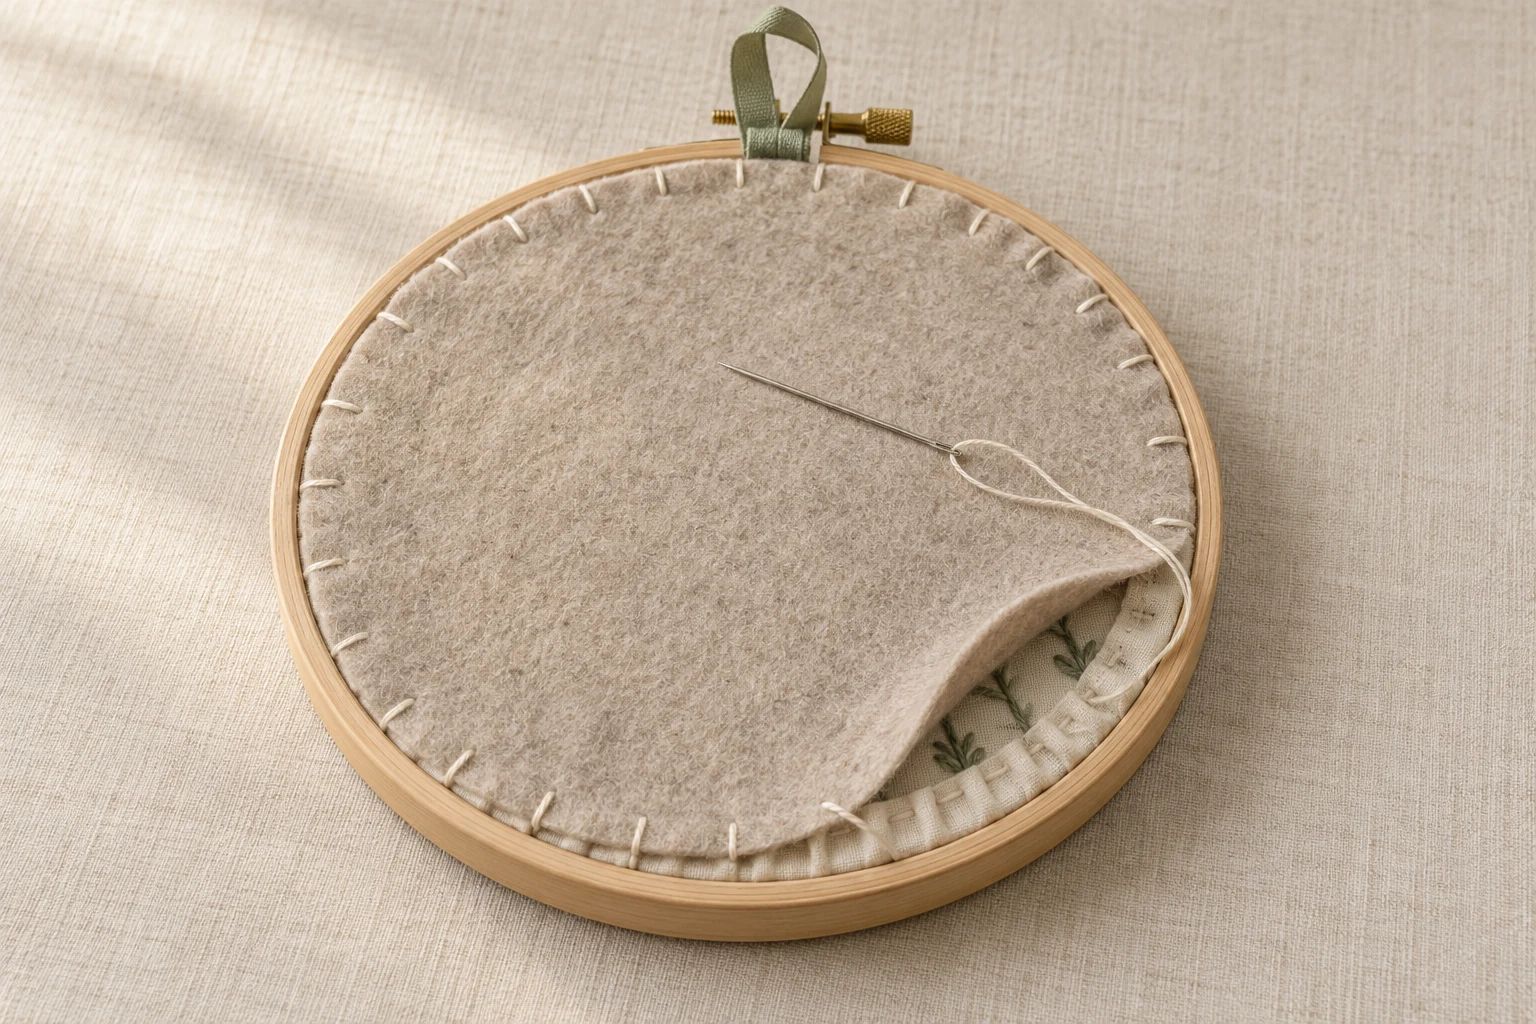
Cover image: AI-generated editorial concept; not a customer project or production proof.
To finish an embroidery hoop, center the completed embroidery, secure the fabric in the hoop, trim a generous allowance, then gather that allowance behind the hoop with running stitches and tie the thread ends together. Add a sewn felt backing if you want to cover the reverse. This basic approach is demonstrated in Wandering Threads Embroidery’s hoop-finishing tutorial.
The following method suits completed hoop art for home display or gifting. It covers preparation, gathering, backing choices and hanging, with measurements in inches and metric units.
Gather your materials
Your completed embroidery and a display hoop that fits the design.
Fabric scissors, a hand-sewing needle and strong sewing thread or embroidery floss.
A ruler or tape measure.
Optional felt, a marking pencil and coordinating thread for a backing.
Optional ribbon for hanging.
Leave enough fabric to make adjustments before trimming. DMC’s fabric preparation guide recommends keeping several centimeters around the design so that finishing options remain open.
Prepare the embroidery before finishing
Secure any unfinished embroidery threads before covering the back. Inspect the front for loose stitches, marks and creases while you can still reach both sides.
Washing is optional. Check the care instructions for the fabric, threads, transfer method and embellishments first; some combinations cannot be washed. If cleaning is appropriate, complete it before final mounting and let the work dry fully. Press only as the materials allow, protecting raised stitches from flattening. DMC’s finished-needlework care guide explains these material-dependent precautions.
If you plan to paint or wrap the outer hoop, do so before final assembly. Let any finish dry completely before it touches the fabric.
Finish the hoop with running stitches

1. Center the design and adjust the tension
Position the design with the hoop screw where you want the top to be. Smooth the fabric evenly around the ring, then tighten the screw. Check the front before cutting: the design should sit level, with no obvious slack or stretched shapes.
2. Trim the excess fabric
Leave about 1–2 inches (2.5–5 cm) beyond the hoop as a practical starting allowance. Check that it folds comfortably behind your particular ring before cutting. Published maker methods vary: Wandering Threads uses roughly an inch, while Amy Loves to Sew uses about two inches.
Keep the allowance reasonably even; its outer edge will be hidden. Avoid trimming close to the wood, which leaves little fabric to gather or grip during later adjustments.
3. Sew around the fabric allowance
Use a continuous thread long enough to travel around the fabric edge with extra length for two accessible tails. A fixed 12–16-inch length will not suit every hoop.
Leave the starting tail unknotted. Pass the needle alternately down and up through the excess fabric to form running stitches, keeping clear of its fraying edge. Work around the entire allowance without catching the visible embroidery. Leave a second tail when you reach the starting point. Amy’s gathering tutorial demonstrates this continuous-thread method.
4. Gather and secure the fabric
With the back facing you, pull the tails gradually so the fabric folds inward. Distribute the gathers around the ring instead of allowing one large bunch to form. Check the front again, then tie the tails together securely. Trim excess thread without cutting flush against the knot.
The gathering holds the spare fabric behind the hoop; the hoop itself should already be gripping the work. You can leave the reverse open or add a cover. Wandering Threads’ finishing instructions show both outcomes.
Add an optional felt backing
Before mounting, trace around the outside of the inner ring onto felt and cut out the circle. After gathering, check its fit against the back. It should cover the opening and overlap enough of the folded fabric for sewing.
Attach the felt with small whip stitches: pass through the felt edge and a small bite of the gathered allowance, then repeat around the circle. Keep the needle away from the visible front fabric. Secure the finishing thread and tuck its end beneath the backing. Little Dear’s hoop-finishing tutorial illustrates this attachment.
A name or date can be stitched onto the felt before it is attached, as shown in Amy Loves to Sew’s backing example.
Compare finishing options

Finish | Benefits and limitations |
|---|---|
Gathered fabric with an open back | Requires few supplies and leaves the reverse accessible. Gathers and embroidery threads remain visible. |
Gathered fabric with sewn felt | Covers the reverse neatly. Adds another sewing step and some thickness. |
Woven fabric backing | Offers different colors and patterns. Plan a turned-under or otherwise finished edge. |
Glued fabric allowance | Secures the folded edge without gathering stitches. Makes later repositioning or removal more difficult. |
Card insert | Covers the opening, but material choice matters for long-term contact with the embroidery. |
Little Dear demonstrates gathering, gluing and backing alternatives. For an ordinary craft piece, choose according to the appearance you want and whether you expect to reopen it.
Recycled packaging card is useful for making a disposable sizing template, but avoid leaving ordinary cardboard against a valued textile. The Canadian Conservation Institute’s textile-care guidance identifies risks from unsuitable mounting materials. A wooden craft hoop with felt backing should not be treated as a conservation mount for antique or fragile embroidery.
Solve common finishing problems
The fabric slips while gathering. Pause and adjust the hoop’s grip before tightening the gathering thread further. If the ring cannot hold the material evenly, resolve the fit before adding a backing.
The back feels bulky. Spread the folds around the ring. Thick fabric or an unnecessarily wide allowance can make gathering awkward. Make any further cuts cautiously, keeping enough fabric for secure stitches and future handling.
The design becomes distorted. Loosen the gathering and reassess the front tension. Pulling harder is unlikely to correct uneven mounting.
Dark threads show through the front. Inspect the reverse before closing it. A cover at the rear of the hoop may not conceal threads lying directly against translucent fabric. Little Dear describes an optional plain fabric layer behind the embroidery, installed before final finishing; test its effect on the appearance first. See the backing alternatives.
Hang and care for the finished hoop
Use a secure ribbon loop around the top fastening, or a suitable hook that supports the hoop. Check the attachment before letting go. For an adhesive wall hook, follow its instructions for surface preparation and supported weight.
Choose a position away from direct sunlight and damp conditions. A felt back does not protect the exposed front from dust or light. For valuable textiles, discuss protective framing and suitable mounting materials with a textile conservator or experienced conservation framer. The Canadian Conservation Institute recommends protection from dust and light and keeping glazing clear of the textile.
When buying a kit or finished hoop as a gift, confirm whether the hoop, backing and hanging attachment are included. Ask for finished dimensions and care instructions; keep inches and centimeters clearly labeled when comparing listings from US, Canadian and UK sellers.
Frequently asked questions
Do I need glue or a protective coating?
No. Gathering stitches and a sewn backing can complete the finish without adhesive. Do not coat the stitched surface as a routine finishing step; DMC cautions against protective coating sprays on cross stitch because they can react with thread dyes.
Can I leave the back uncovered?
Yes. Once the fabric allowance is gathered and secured, a separate cover is optional. Choose felt if you prefer to conceal the reverse for gifting or display.
Can I remove the embroidery later?
A sewn finish can usually be opened by carefully removing its backing and gathering stitches. Trimming the original fabric is permanent, however, so retain a generous allowance if you may reframe the work.
Does a large hoop need extra glue?
No automatic increase in adhesive is needed. Use enough gathering thread, distribute the folds evenly and check that the hoop grips the fabric. Size the backing to the actual ring rather than assuming a thicker cover will correct poor tension.
Practical details for How to Finish an Embroidery Hoop: Gathering, Backing and Display
Use the article above as a starting point, then make the production brief specific to your own design. A stitch file is made for a finished size and material, so the artwork alone is only part of the instruction.
Work through these points in order and keep the answers with the artwork or production request. A short written brief makes it easier to compare a proof with the intended result, ask a useful follow-up question and avoid relying on assumptions made from a screen image alone.
The aim is not to add unnecessary steps. It is to identify the choices that change the final result before work begins. If a requirement is unknown, flag it for confirmation rather than guessing; that keeps the approval process focused on the design, material and use that apply to this particular project. Save the approved brief with the project files for future reorders or revisions.
Confirm the finished use
State the item, placement and finished width and height. A chest logo, cap front and jacket back do not use the same sewing area, even when they start from the same artwork.
Protect the smallest details
Review small lettering, narrow gaps, thin outlines and tiny colour changes at the final size. Simplifying a fragile detail before digitizing is often more reliable than trying to force it into a small sew-out.
Match the file to the machine
Tell the production team the embroidery machine or format required, along with the fabric or garment type. This lets them prepare the right export and make choices that suit the material rather than treating every job alike.
Quick questions to check before you proceed
What should I send with my artwork?
Send the clearest original available, the finished dimensions, placement, fabric or garment type and the required machine format if you know it.
Can the same file be used at every size?
Not always. Scaling changes the relationship between stitch length, detail and fabric, so a design may need review when the finished size or placement changes.
What should I check before production?
Confirm the spelling, colours, final size, placement and any details that must remain readable. A proof or sample is the best point to catch a change.